6 Big Technology Achievements Of 2015

Leave a Comment

The year of 2015 was certainly revolutionary in the world of gadgets and technology. Phones became even more smarter, drones became realistic and cheaper. People finally started making every purchase online. We have complied a list of biggest technological developments of 2015.

Robots can smile


A humanoid robot named "Yangyang" shows a facial expression during its demonstration at the Global Mobile Internet Conference in Beijing, China, April 29, 2015. The android was produced jointly by China's Shanghai Yangyang Intelligent Robot Science Service center and Japanese professor Hiroshi Ishiguro, with the aim of popularizing robotics among the young.

Drones fly high


Drones fly in synchronization above attending conference-goers as they dine outside along the ocean during the opening remarks at the beginning of the Wall Street Journal Digital Live conference in Laguna Beach, California October 19, 2015.

A robot that can cook


A robot in the Robotic Kitchen prototype created by Moley Robotics cooks a crab soup at the company's booth at the world's largest industrial technology fair, the Hannover Messe, in Hanover, Germany April 13, 2015.

Google shows off its car


A prototype of Google's own self-driving vehicle is seen during a media preview of Google's current autonomous vehicles in Mountain View, California September 29, 2015.

Samsung joins VR race


Guests use Gear VR virtual reality headsets, made by Oculus and Samsung Electronics, during a preview session in Hollywood, California September 24, 2015.

3D printed robotic prosthetic hand


A man shakes hands with a robotic prosthetic hand in the Intel booth at the International Consumer Electronics show (CES) in Las Vegas, Nevada January 6, 2015.

How To Host Blogger CSS And JavaScript Files In Google Drive

Leave a Comment
Hosting CSS and JavaScript files on your Blogger blog has always been a matter of concern for a webmaster. People prefers to add their entire StyleSheet coding in one file, so they can upload it to their hosting and can easily apply it on their website. 

Unfortunately, blogger has quite a few limitations that stop you from hosting CSS and JavaScript files. Google Drive provides you the opportunity to host CSS, JavaScript and HTML Files for FREE.

Storing Blogger CSS and JavaScript files with Google Drive will help to eliminate the problems such as Site Loading speed, SEO and reduce the clutter among your services. Taking this method can increase your site speed, increase the opportunities for a successful SEO campaign, and make your life so much easier.

Google Drive provides ample amount of space to store large files, and offers collaboration services so that you can work among different team members on the same project. Some of the files that you upload into the cloud services can remain unpublished and stay within the private site, whereas other files like blog posts can be published or stored to the public site.

Another beneficial feature of storing all your Blogger files on Google Drive is that it is highly secure. Google comes with the backing of one of the leading companies in the technical world so that you can be sure your content is safe from hackers and those looking to compromise your site.

This guide will provide you with step-by-step instructions on how to setup your Blogger site using Google Drive. It's completely free to take advantage of this strategy, and will provide you with a solid platform from which to build your blog.

Prepare the CSS/JavaScript Files

First, we need to create the file that we need to host. To host a CSS file, open the Notepad and paste the CSS code (if it is enclosed within the <style> and </style> tags, remove them).

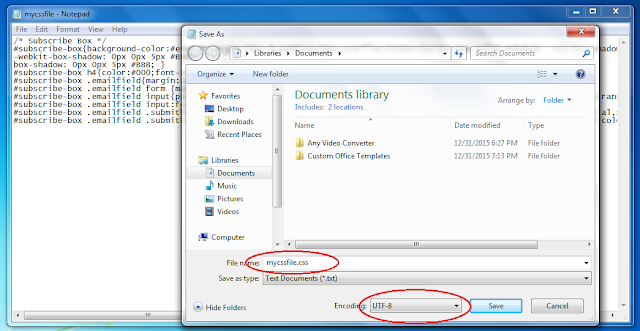
In the Notepad menu, select 'File' >> 'Save as' and type the file name with the .css extension just like I did with mycssfile.css - see the screenshot below.


In the same window, choose "All files" in the "Save as type" option and set the Character Encoding to UTF-8.

If you want to host a JavaScript file, add the.js extension (instead of .css) at the end of your file name (remove the <script> & </script> tags if you see them). Click "Save" and navigate to the location where you want to save the file.

Upload Your File on Google Drive

Access https://drive.google.comand log in with your Gmail account. After you logged in, click on the 'Create' button and add a new separate folder to upload your JavaScript and CSS files.


Open the newly created folder, then right click on the empty space and click Upload button to choose the files that you need to upload.


Now, navigate to the location where you saved the files, select them (to select multiple files, press and hold down the Ctrl key on your keyboard and then click on them) and press the Open button.

After the files have been successfully uploaded, right click on the file names, and select 'Share':


In the 'Sharing settings' window, click on the 'Change' link and choose the 'Public on the web' option. Press 'Save' and copy the link of your uploaded file from the 'Links to share' box highlighted in red box, then paste it into a Notepad to use it later.


How to Add an External CSS/JavaScript file to Blogger

Before you can use the links, you must replace 'https://drive.google.com/file/d' to 'https://googledrive.com/host' and remove '/view?usp=sharing' in the link.

For example, the link to mycssfile.css that I copied looks like this:
https://drive.google.com/file/d/0B-AYvC9Y1riaZmY5TVczNFZkMEU/view?usp=sharing
Notice the part in blue after the "/file/d/" part. That is the file ID which is used to access it via the new hosting service. It should 

start with the following URL:
https://googledrive.com/host/
Add the file ID like this (remove the '/edit?usp=sharing' part):
https://googledrive.com/host/0B-AYvC9Y1riaZmY5TVczNFZkMEU
Now log into your Blogger account, select your blog and go to Template >> Edit HTML. Click anywhere inside the code area and press the CTRL + F keys to open the search box:


If you want to add a CSS file, type the following tag inside the search box and hit Enter to find it:
<head>
Just BELOW the <head> tag, add this line:
<link rel="stylesheet" type="text/css" href="https://googledrive.com/host/0B-AYvC9Y1riaZmY5TVczNFZkMEU">
Replace the line in red with your URL:

If you want to add a Javascript file, search for the following tag:
</body>
And add this line just ABOVE it:
<script src='https://googledrive.com/host/0B-AYvC9Y1riaZmY5TVczNFZkMEU' type='text/javascript'></script>
Replace the line in red with your URL:

Finally, press the 'Save template' button to save the changes. And you're done!

Simple Method To Unblock Your Facebook Account

Leave a Comment


So your Facebook account got blocked ? It is a common problem in Facebook, many Facebook users get blocked by doing some not allowed activities in Facebook. In today's article i gonna share you how to unblock your Facebook account.

There are many reasons due to which your Facebook account may get blocked.
  • Using Software to publish in groups.
  • Sending various friend requests to unknown people
  • Joining multiple groups at once.
  • Adding More Friends very fast.
  • Posting Same Comments on Others Pages or Posts.
Methods To Avoid Facebook account For getting blocked
  • leave New Facebook Account for at least one week.
  • Keep your Friend lists Short So that you can identify the photos during Facebook photo verification.
  • Add those people you know very well to
  • Start joining groups after one week in new Facebook accounts
  • Do not join multiple groups at once, join 5-10 groups a day.
  • Do not accept friend requests you do not know.

Simple Method To Unblock Your Facebook Account

This Is very Popular Method These Days, There are 100% chances to get unblocked by using this method.

All You have to do just take an Android Phone and download Tunnel Bear, This is an app which allow to change your location, by using this app you can browse internet by changing your location to different countries in the world.

After successful installation of Tunnel Bear just signup and verify your email and come back to the app and change the country to JAPAN.

Now open your mobile browser and open Facebook in browser. Now login with your Blocked Facebook id. You will be asked to verify your mobile number, just put your mobile number and select your country. A verification code will be sent to your mobile number, just verify your mobile number.

Your account is now unblocked.

Facebook will not ask for Photo tag verification, you can verify your account only using a mobile number, you can put any number to verify your id, facebook will send a code through SMS in that number and will ask to put the same code to verify that number

Do not forget to share this amazing trick to help other.

How To Make Any Widget Sticky In Blogger

Leave a Comment
When a visitor scrolls down your blog to view more content, the upper portion of your blog goes out the window from the top to make way for the lower portion that enters from the bottom.

Now what we are going to do is stick your chosen widget to the top edge of the window as it is about to leave, thus making the widget visible at all time while the visitor scrolls. It will float there until its original location comes back when the page is scrolled back up.

This trick is applicable to any widget or element that has an ID, regardless of its location on your blog. It is perfect for navigation bar, subscription box and social media sharing buttons.

As usual Login to your Blogger. Select your Blog, Go to Template >> Edit HTML

Paste the following code above the </body>:
<script>
//<![CDATA[
bs_makeSticky("YOUR_WIDGET_ID"); // enter your widget ID here
function bs_makeSticky(elem) {
    var bs_sticky = document.getElementById(elem);
    var scrollee = document.createElement("div");
    bs_sticky.parentNode.insertBefore(scrollee, bs_sticky);
    var width = bs_sticky.offsetWidth;
    var iniClass = bs_sticky.className + ' bs_sticky';
    window.addEventListener('scroll', bs_sticking, false);
    function bs_sticking() {
        var rect = scrollee.getBoundingClientRect();
        if (rect.top < 0) {
            bs_sticky.className = iniClass + ' bs_sticking';
            bs_sticky.style.width = width + "px";
        } else {
            bs_sticky.className = iniClass;
        }
    }
}
//]]>
</script>
<style>
.bs_sticking {background:#f2f2f2 !important; position:fixed !important; top:0; z-index:9999; box-shadow:0px 10px 4px -5px rgba(0,0,0,0.3); margin-top: 0; position:relative\9 !important;}
</style> 
Get the ID of the widget or element you want to make sticky and enter it in line 6 (replacing "YOUR_WIDGET_ID"). For example let's say the widget ID is HTML5, then code line 3 would become:
bs_makeSticky("HTML5");
Save your Template. That’s all, Thank You!

Automatically Open all External Links in a New Window in Blogger!

Leave a Comment

We sometimes put links in our posts. And naturally our visitor will click on those links. By default when a link is clicked it will open in the same window.

If your blog is like mine where visitors only come in once, keeping them in your blog once they come in is crucial. We wouldn't want them visitors disappear from our blog through outbound links, now would we?

This content will explain how you can automatically targeted blank to every external links attached with your blog posts. Most of the times, bloggers forget to add target blank tag towards the external link so when the visitor click the external URL, visitor may leave your blog because you might have not set the mark blank about that URL. I am going to tell you with a simple jQuery code which immediately set all the target blank tags to all external links. By adding this code in your blog template each of the external back links will be open in a new tab while your visitor stick to your web site. It wont effect on you inner linking. So lets see how to add this script to your blogspot blog.

As usual Go to Blogger >> Template >> Click "Edit HTML"

Just above </head> paste the following script:
<script src='http://ajax.googleapis.com/ajax/libs/jquery/1/jquery.min.js' type='text/javascript'></script>
<script type='text/javascript'>
$(document).ready(function() {
  $("a[href^='http://']").each(
    function(){
     if(this.href.indexOf(location.hostname) == -1) {
        $(this).attr('target', '_blank');
      }
    }
  );
$("a[href^='https://']").each(
function(){
if(this.href.indexOf(location.hostname) == -1) {
$(this).attr('target', '_blank');
}
}
);
});
</script>
Please do not add the red code if you already have jQuery library source code installed on your blog.

Save your template and you are all done!

Check your blog and click some external links to see it working just fine!

5 Simple Ways To Access Blocked Websites

Leave a Comment

There are many reasons authorities block access to certain websites. Some workplaces may block social media sites or access to your personal email. You might also experience blocks at your university, college or school.

If you find yourself in this situation, and are looking at a workaround you can apply to overcome this block, don’t worry, we have 5 ways you can try.

We have listed 5 methods here you can try, because different types of blocks require different types of techniques to bypass. Do try each of them to you find one that works for your situation.

1. Accessing Via IP Instead of URL

Some software block website pages by its name or URL only. For example: a block may be applied on www.facebook.com but not on the IP of the website.

You can get the IP from Terminal on OS X or Command Prompt if you using Windows. Insert this and press Enter.
ping yourdomain.com
Copy the IP that is shown in the results onto your browser’s address bar and open the site as usual.

2. Use A Proxy Site

There are many free web proxies that provide services to browse the web anonymously. You can use them to access any blocked site easily. Just go the website and enter the URL you wnat to browse.

How does this work? When you browse a website using a proxy site, you are not actually connected to that website. You are connected to the proxy server, while the proxy server is the one that is connected to the true website destination. What you see is cached version of the site that the proxy server gives to you.

You can try Proxysite or Proxery, but if you want more options, check out Newproxysite.

3. Use a VPN Service

A Virtual Private Network or VPN is a remote server that gives you private access through a public network. VPN makes it looks as though you are browsing from the country where the server is located, thereby hiding your real identity.

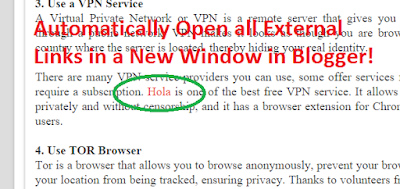
There are many VPN service providers you can use, some offer services for free, others require a subscription. Hola is one of the best free VPN service. It allows you to browse privately and without censorship, and it has a browser extension for Chrome and Firefox users.

4. Use TOR Browser

Tor is a browser that allows you to browse anonymously, prevent your browsing habits or your location from being tracked, ensuring privacy. Thanks to volunteers from around the world that create this distributed network of relays, you can browse under the protection of Tor.

To use, first you need to download the Tor Browser; install it like a usual application. Open the application, then click Connect to start your connection with the Tor network.

5. Using Public DNS of ISPs

Some Internet Service Providers (ISP) use their own DNS to block access to some websites. To open the block you can bypass the restriction from ISP using Google Public DNS.

Under the DNS configuration of yoru network, change your DNS to the following Google Public DNS IP addresses as your primary or secondary DNS server.

IPv4
8.8.8.8
8.8.4.4
IPv6
2001:4860:4860::8888
2001:4860:4860::8844

Remove Backgrounds from Photos without Photoshop

Leave a Comment

Adobe Photoshop contains tools like the background eraser and an extract filter to help you quickly erase complicated background images from digital photographs.

Want to do something similar but without Photoshop ?

Just upload your picture to FotoFlexer, an online photo editor, and open the Geek tab. There you’ll find an intelligent tool called "Smart Scissors" that works much like the Magnetic Lasso selection tool of Photoshop.
erase-backgrounds Draw a rough boundary around the image that you want to separate from the background and you will notice that "Smart Scissors" magically snaps the curves to the nearest edge.

Once satisfied with the selection, click "Create Cutout" and you’re done.

You can use this free FotoFlexer service to extract picture of a particular person from some group photograph or you want to merge two photos – cut a portion from the first image using Smart Scissors and place in over the second picture.

The cutouts can be saved as JPGs or a PNG so I guess it maintains the transparency as well.

Superfast Computer Chip Transmits Data With Light

Leave a Comment

Computer chips have two important parts—the logic on the chip, which computes and executes programs. Then there’s the part that sends and receives—gets data to crunch, sends back the answer. And while that first part, chip logic, has gotten much faster over the years, the transmission part has lagged behind. Because data gets sent via electrical signals passing through copper.

So researchers designed a chip that exchanges data with light instead. "By going into optics, we're able to relieve this fundamental bottleneck of copper, and in doing so we're able to increase the bandwidth density on the chip, so how fast the chip can take data in and out, by an order of magnitude." Chen Sun, a computer hardware researcher at UC Berkeley, and the startup Ayar Labs.

A metal pin on the memory chip in your computer might transmit at 1.6 gigabits per second. Sun's optical connection ups that rate to 2.5 gigabits per second. Not a huge difference on the face of it. But the killer app here is that multiple wavelengths of light—up to 11—can be used simultaneously to send data through a single fiber. Which means this technology has potential speeds of 27.5 gigabits per second—more than an order of magnitude faster than today’s standard. "So that's the extra dimension we have to scale bandwidth that we don't have with normal electrical signals." The findings appear in the journal Nature. [Chen Sun et al, Single-chip microprocessor communicating directly using light]

These chips with optical connections are not just high-speed—they also require less energy than the copper versions. That could be a big deal, with server farms projected to outpace every other commercial use of electricity within the next decade. Going optical could thus be a win-win: faster processing using a fraction of the energy.

Google Begins Testing Password-Free Logins

Leave a Comment

Google on Tuesday confirmed it has invited a small group of users to help test a new password-free way to sign into their accounts. "'Pizza', 'password', and '123456' — your days are numbered," a Google spokesperson said in a statement, referring to some of the most common passwords and secret question answers people use.

The new system lets you verify your identity via your smartphone, according to Reddit user Rohit Paul, who first reported the experimental feature. It works like this: You go to log in to your Google account like normal, but instead of entering your email address and password, you provide just your email. Next, Google will provide a secret code — in Paul's case, the number 21 — and tell you to look at your phone.


The Web giant will then send a message to your phone asking if you're trying to sign in. If you answer "yes," you'll then need to provide the secret code on your phone, and voila, you're in.

The test works on iOS and Android, and you can still log in with your regular typed password if you prefer, Google said. Aside from being way more user friendly than passwords, the new system can help protect against phishing schemes designed to trick users into unknowingly handing their personal details to hackers.

Meanwhile, Google isn't the first company with this idea. Yahoo in October updated iOS and Android apps with a new authentication system that uses push notifications to verify you. The blogging site Medium launched a similar system in June that lets you sign in using just an email address.

DISQUS Comments ONCLICK Event For Blogger

Leave a Comment

Disqus Comments with on click event is tutorial about how to add Disqus comments form for Blogger's users. This blogger's tips can can make pages loading faster because only loads the comments when visitors clicked on show &amp; hide button. In this tutorial there is a code that using Font Awesome. Make sure the template already have Font Awesome installed.

If the template already have their Disqus widgets, in order for this tutorial can be applied properly. Please remove Disqus widgets and all the code relating to Disqus first.

As usual Login to your Blogger. Go to Template >> Edit HTML:


Find the below code on your blogger template: (Press CTRL + F to search)
]]></b:skin>
Add this CSS before the ]]></b:skin>
.show-comments{position:relative;overflow:hidden;display:block;padding:15px 20px;text-align:left;color:#222;font-weight:700;text-transform:uppercase;letter-spacing:.5px;cursor:pointer;margin:10px 0;background:#fff;border:1px solid #e5e5e5;-moz-box-shadow: 0px 0px 5px #BBB;
-webkit-box-shadow: 0px 0px 5px #BBB;
box-shadow: 0px 0px 5px #BBB; transition:all .3s; width:100%}.show-comments:after{display:inline-block;content:"\f086";font-family:fontAwesome;font-style:normal;font-weight:normal;font-size:18px;color:#e73138;top:0;right:0;padding:12px 20px;position:absolute}.show-comments:hover,.show-comments:active{color:#e73138}

Then add the following code before </body>
// Requires jQuery of course.
$(document).ready(function() {
    $('.show-comments').on('click', function(){
          var disqus_shortname = 'smartpik'; // Replace this value with *your* username.
          // ajax request to load the disqus javascript
          $.ajax({
                  type: "GET",
                  url: "http://smartpik.disqus.com/embed.js",
                  dataType: "script",
                  cache: true
          });
          // hide the button once comments load
          $(this).fadeOut();
    });
});
  <script id='dsq-count-scr' src='//smartpik.disqus.com/count.js'/>

Change smartpik to your disqus shortname, there is three shortname of it.
Then find this code:
<div class='comments' id='comments'>
And add this code before that:
<button class='show-comments'>Load Disqus comments</button>
<div id='disqus_thread'/>
To show Disqus comment count in the index page and posting, Please add the code below to meta or post information in accordance your template.
 <a expr:href='data:post.url + &quot;#disqus_thread&quot;'/>
That’s all. Thank You

All Hidden Android Secret Codes

Leave a Comment

Android platform is known for its customization. The Android smartphone holds a large amount of information about its hardware and system that a common user might find difficult to access. But, if you know Android secret codes, you can find all the hidden information and do lot more customization to your handset.

These secret codes are just needed to be entered in the device dialer with a proper sequence. Today I am listed some secret codes of Android smartphone that will help to get more details of the smartphone.

Remember, these codes are carrier-specific, and might not work on all devices. If your handset doesn't respond to a code, don't force to make changes, just move on and find another one.

The below listed codes are mostly universal and should work on Android devices, no matter the manufacturer and carrier provider.

Generic Android Secret Codes
  • *#06# - IMEI
  • *#*#7594#*#* - Make Power button turn off your device without displaying menu
  • *#*#4636#*#* - Display information about phone, battery, usage and Wi-Fi
  • *#*#7780#*#* - Factory reset (deletes app data and apps, not firmware)
  • *2767*3855# - Complete phone wipe, including firmware (not to be used lightly!)
  • *#*#273283*255*663282*#*#* - Back up all your photos and videos
  • *#*#1472365#*#* - Test your GPS
  • *#*#1234#*#* - Display phone firmware and PDA info
  • *#*#232338#*#* - Show Wi-Fi Mac address
  • *#*#8255#*#* - Access GTalk Service Monitor
  • *#*#36245#*#* - Access Email debug info Email
  • *#*#225#*#* - Events calendar
  • *#*#426#*#* - Debug info for Google Play Service
  • *#*#759#*#* - Access Google Partner Setup

Samsung Secret Codes
  • *#*#34971539#*#* - Show all camera information
  • *#*#197328640#*#* - Enable test mode for services
  • *#*#232339#*#* - Wireless LAN test
  • *#*#1575#*#* - Test your GPS (alternative to generic Android GPS test)
  • *#*#0*#*#* - Test your LCD display
  • *#*#4986*2650468#*#* - Display crucial phone information (PDA, Hardware, firmware etc.)
  • ##778 and press Call button - EPST menu

HTC Secret Codes
  • *#*#3424#*#* - HTC function test Program
  • *#*# - HTC Info menu
  • *#*#8255#*#* - Launch GTalk Service Monitor
  • ##3424# - Diagnostic mode
  • ##3282# - EPST menu
  • ##8626337# - VOCODER
  • ##33284# - Field trial menu
  • ##786# - Reverse Logistics Support
  • ##7738# - Protocol Revision

Remove Footer Credit Link from Blogger Template without Redirecting to Any Website

Leave a Comment
Many websites available on the internet which provides very stylish blogger template at very low cost. If you purchase their template than that template will not contain any credit link. These websites also provide most of the free blogger template with Non-removable credit link. Means, what? If you'll try to remove credit link from their template, then your blog will automatically redirect to their website. This is because they added some JavaScript into their free templates. In other hand, if you undo the changes and keep their original credit of template then it works perfectly.

Basically, newbies blogger don't want to invest money in purchasing any premium template and thus, use these types of free template for their blog. Many of them are trying to remove credit link but unsuccessful, if you are one of them then no need to wait more. Because here I have shared the method by which you can remove footer link and stop redirecting to any website.

Actually, these links are attached with some JavaScript or CSS. Finding JavaScript from the template and then removing is too boring and time-consuming also it requires lots of effort to do this. But in other hand, you can easily hide the credit/footer link via CSS. This method is very simple.

First of all go to Blogger. Just Login to your Blogger Profile and select your blog.

Now go to Dashboard >> Template >> Edit HTML:


Go to the footer and find the credit/footer link which needs to remove/hide. You'll find something like Copyright, credit or designed etc.


Add the following line with your original copyright ID.
style="visibility:hidden;"


Some of you are searching on the internet how to remove footer credit link and convert free blogger template into premium. So, I hope this tutorial helps you. Thank You!

Integrate DISQUS Comment System in Blogger

Leave a Comment
Your blog must possess and hold two important elements and that is mainly to enhance the blog experience to your blog readers. One main thing is the post date on every blog posts and other is the commenting system below each blog posts. Commenting system in blog posts is a great way to communicate and interact with your blog commenters regarding that blog topic. Also your readers will gain some additional knowledge from your blog comments section. Here we will see how to add Disqus on Blogger that is we will see how to integrate Disqus comment system in Blogger blogs.

Disqus is a yet another commenting system which is flexible enough to support API integration including Facebook, Twitter, Google, Open URL, and users can even login through their personal Disqus account (where all our conversation is being recorded). Another thing which makes it better, than any other commenting system is its, robust functionalities.

There is an easy way of integrating Disqus in Blogger. We have to just register a new account over Disqus and by Widget integration it will override all the old/previous comments. Thus, Disqus would be installed successfully.

Registering a New Account over Disqus: Perhaps the easiest part of the whole tutorial is to register your new account. Just head to Disqus.com and register a free account for your website. Select “Get this on your Site” and it will open a new registration form just fill it and head to the next step.  (Do not forget to verify your identity though email verification).


On the next screen enter your site name, pick category and click finish registration.


After pressing the Continue button, a new window will appear, which will ask you to select a Platform. Just Select "Blogger" from the list and proceed to the next step.


Installing Disqus Widget (Plugin) in Blogger: After selecting "Blogger" as your platform, a new page will be open'd. From here, the tutorial will get a little complex. This installation consists of two steps one to add Widget in Blogger and second to import old comments.


Adding Widget:: Now on the page there will be two options. Just Select Add "Your Site Name" to my blogger site and a new window will pop'd out which will allow us to install the widget in our blog respectively.


From the list select your blog and press the blue "Add Widget" button. It will successfully install Disqus commenting system in your site.

Importing Comments: Now head back to the previous page where we were working previously  Since, we have fished working with the first step so, now head to the second one. In order to import your old comments from previous platform just go to Tools > Import and proceed to the next step.

On reaching Import menu there will be two options, but we have to select "Import comments from Blogger" so that it imports all those comments which are previously published on the site.


After selecting "Import Comments", it will take you to a new page where it will ask for accessing your blog's data. Just give it the permission by pressing "Grant Access" button.

After granting the permission go back to the Import >> Tools Page. Now you will be able to see a new option there i.e. "Choose a blog to import from" which will allow you to import comments from your blog. From the list select a blog to import comments. Once, the blog is selected press the "Import" button.

Congratulations, Disqus is successfully integrated into your Blogger enabled website. All the old comments will be processed one by one and would be available on your site once the Disqus team finishes reviewing it.

Some other delightful perks of using Disqus is that it allows us to generate a decent amount of revenue by showing some advertisements within comments. Some large organizations always prefer it because it not only helps a community to grow but also provides reliability and user satisfaction. All an all, it is a must have comment system.
Powered by Blogger.

Business

[Blog][feat-sec1]

Flickr Widget

Recent

Comments

Most Recent

Random Posts

Facebook

Advertising

Popular Posts