Simple Countdown Timer Widget For Blogger

Leave a Comment


How to add a Responsive Countdown widget in Blogspot Blog - As you guys already know that, A countdown displays a small box on your Blogger page that counts down the days until a big event, such as Christmas, Valentine's Day or even the birth of a baby. And every blogger want to display these type of cool widgets on their blog. So that is the main reason today I'm going to share with you a simple stylish counter plugin for your blog. The best part of this widget is that, it's showing the left days, hours, minutes, and seconds.


Now, before you set up this plugin on your blog, make sure to take a look of this widget by clicking on the below demo button.
Now, if you want to install this countdown plugin on your own blog, then simply follow the below simple steps.

At the first, visit to your blogger dashboard. Go to the "Template" section. Click on the "Edit html" button.

In the "Template Editor" add the below CSS code just before ]]></b:skin>
#pikcounter{background:#31acce;color:#ffe8a0;font-size:18px;text-align:center;padding:30px 15px;font-weight:700;border-radius:3px;line-height:normal;font-family:'Open Sans',Verdana,Arial,sans-serif;background:#e73138}.digitaltime,.digitaltext{color:#fff}@media screen and (max-width:920px){h2.entry-title{padding:15px 0}.infoarlina-meta .lefty .labels{display:none}}@media screen and (max-width:767px){.post-thumbnail{margin:0 0 5px auto;float:none}}
Copy the below JavaScript code and paste it just before </body>
<script type='text/javascript'>//<![CDATA[var target_date=new Date("Jan 01, 2017").getTime();var days,hours,minutes,seconds;var smartpikcount=document.getElementById("smartpikcount");setInterval(function(){var current_date=new Date().getTime();var seconds_left=(target_date- current_date)/ 1000;days=parseInt(seconds_left/86400);seconds_left=seconds_left%86400;hours=parseInt(seconds_left/3600);seconds_left=seconds_left%3600;minutes=parseInt(seconds_left/60);seconds=parseInt(seconds_left%60);smartpikcount.innerHTML=days+" <span class=\'digitaltime\'>Days</span> "+ hours+" <span class=\'digitaltime\'>Hours</span> "+ minutes+" <span class=\'digitaltime\'>Minutes</span> "+ seconds+" <span class=\'digitaltime\'>Seconds Left</span> <span class=\'digitaltext\'>For 2017</span>";},1000);//]]></script>
The above code contains two highlighted sections. The first one is the targeted date and the second one is the text about the event. You can replace this two sections with your own content.

After that, apply the below "HTML" code anywhere you want to show this widget
<div id="pikcounter"><span id="smartpikcount"></span></div>
All done, If you face any kind of problem, then feel free to ask me via the comment section. I hope you like this Widget! Stay tuned for more blogger widgets!

How to Display Estimated Post Reading Time on Blogger

1 comment

How to add an Estimate Post Reading Timer Plugin in Blogspot Blog - Today Smartpik will share a new widget that is quite interesting. With the help of this plugin, your readers can easily know about your article reading time (e.g How much time it will take to read this article). 

Now, before you set up this timer plugin on your blog, make sure to take a look of this widget by clicking on the below demo button. (Just look at the "Title" of this article.)
For those who want to try this plugin on your own blog, simply follow the below simple steps.

At the first, visit your blogger dashboard, Go to the "Template" section and then click on the "Edit HTML" button.

Add the below Font Awesome code just after <head> (Leave this step if you have already installed this CSS code).
<link rel="stylesheet" href="https://maxcdn.bootstrapcdn.com/font-awesome/4.5.0/css/font-awesome.min.css">
Apply the below code just before ]]></b:skin>
span.right {float:center;display:inline-block;padding:10px 5px;}.read-time{padding:5px;width:100%;background:#ebebeb;margin-bottom:10px;font-family: "Avant Garde",Avantgarde,"Century Gothic",CenturyGothic,AppleGothic,sans-serif;font-weight:700;font-size:12px;}
Copy the below JavaScript code and paste it just before </body>
<script type='text/javascript'>//<![CDATA[// Reading Time Author: Michael Lynch http://michaelynch.com Licensed under the MIT license!function(e){e.fn.readingTime=function(n){var t={readingTimeTarget:".eta",wordCountTarget:null,wordsPerMinute:270,round:!0,lang:"en",lessThanAMinuteString:"",prependTimeString:"",prependWordString:"",remotePath:null,remoteTarget:null,success:function(){},error:function(){}},i=this,r=e(this);i.settings=e.extend({},t,n);var a=i.settings;if(!this.length)return a.error.call(this),this;if("it"==a.lang)var s=a.lessThanAMinuteString||"Meno di un minuto",l="min";else if("fr"==a.lang)var s=a.lessThanAMinuteString||"Moins d'une minute",l="min";else if("de"==a.lang)var s=a.lessThanAMinuteString||"Weniger als eine Minute",l="min";else if("es"==a.lang)var s=a.lessThanAMinuteString||"Menos de un minuto",l="min";else if("nl"==a.lang)var s=a.lessThanAMinuteString||"Minder dan een minuut",l="min";else if("sk"==a.lang)var s=a.lessThanAMinuteString||"Menej než minútu",l="min";else if("cz"==a.lang)var s=a.lessThanAMinuteString||"Méně než minutu",l="min";else if("hu"==a.lang)var s=a.lessThanAMinuteString||"Kevesebb mint egy perc",l="perc";else var s=a.lessThanAMinuteString||"Less than a minute",l="min";var u=function(n){if(""!==n){var t=n.trim().split(/\s+/g).length,i=a.wordsPerMinute/60,r=t/i;if(a.round===!0)var u=Math.round(r/60);else var u=Math.floor(r/60);var g=Math.round(r-60*u);if(a.round===!0)u>0?e(a.readingTimeTarget).text(a.prependTimeString+u+" "+l):e(a.readingTimeTarget).text(a.prependTimeString+s);else{var o=u+":"+g;e(a.readingTimeTarget).text(a.prependTimeString+o)}""!==a.wordCountTarget&&void 0!==a.wordCountTarget&&e(a.wordCountTarget).text(a.prependWordString+t),a.success.call(this)}else a.error.call(this,"The element is empty.")};r.each(function(){null!=a.remotePath&&null!=a.remoteTarget?e.get(a.remotePath,function(n){u(e("<div>").html(n).find(a.remoteTarget).text())}):u(r.text())})}}(jQuery);$(function(){$('.post-body').readingTime();});//]]></script>
Now apply the below code anywhere you want to show this widget.
<div class='read-time'><span class='right'><i class='fa fa-clock-o'/> Estimated Post Reading Time <span class='eta'/></span></div>
After that, click on the save template button to apply the changes.

That's it! I hope you like this Widget! Stay tuned for more blogger widgets!

Simple Random Post Widget For Blogger

Leave a Comment


How to install a simple Random post widget on blogger blog - In my previous article, I already described the importance of the Random Post widget. You can read that article here - "Dynamic Random post widget for blogger". So let's move on the main topic because I'm not going to waste your time by writing boring things over here.

Before you add this simple random post on your blog, make sure to take a look of this widget by clicking on the below demo button.
After watching the demo of this widget, if you agree with it and want to install this widget, then follow the below simple steps.

At the first, visit to your blogger dashboard, Go to the "Layout" section.

Select "Add a gadget", Choose Html/JavaScript from the popup menu.

Copy the below Html code and paste it in Html/JavaScript Box.
<ul id="random-posts"></ul>
<style scoped="" type="text/css">
#random-posts{list-style:none;margin:0;padding:0}
#random-posts li{padding:0 0 5px 0;font-size:90%;margin:5px 0;border-bottom:1px solid rgba(0,0,0,0.1)}
#random-posts li a{color:#333;font-size:12px;}
#random-posts li a:hover{color:#e73138;}
</style>
<script type='text/javascript'>
//<![CDATA[
var homePage = "http://www.smartpik.in/",
numPosts = 8;
function randomPosts(a){if(document.getElementById("random-posts")){var e=shuffleArray(a.feed.entry),title,link,img,content="",ct=document.getElementById("random-posts");for(var i=0;i<numPosts;i++){for(var j=0;j<numPosts;j++){if(e[i].link[j].rel=="alternate"){link=e[i].link[j].href;break}}var title=e[i].title.$t;content+='<strong><li class="random-posts"><a href="'+link+'" title="'+title+'" target="_blank">'+title+'</a></li></strong>'}ct.innerHTML=content}}function shuffleArray(arr){var i=arr.length,j,temp;if(i===0)return false;while(--i){j=Math.floor(Math.random()*(i+1));temp=arr[i];arr[i]=arr[j];arr[j]=temp}return arr}var random_post=document.createElement('script');random_post.src=homePage+'/feeds/posts/summary?alt=json-in-script&orderby=published&max-results=999&callback=randomPosts';document.getElementsByTagName('head')[0].appendChild(random_post);
//]]>
</script>
Replace the above-highlighted URL with your own blog URL.

After that, save the widget, refresh your blog and see the magic.

That's it! I hope you like this Simple Random Post Widget! Stay tuned for more blogger widgets!

Google Docs Now Supports Voice

Leave a Comment

It has been a while since Google Docs was updated with any new cool feature. Many of us use Google Docs for real-time collaboration purposes but Google wants to change that. The big G wants us to use Google Docs for taking notes and capturing our thoughts. Keeping that in mind, it has now enabled Google Docs with voice support.

Now you will be able to write whatever you want in Google Docs without even typing a single word. Yes, you can keep your keyboard aside and dictate whatever you want to write to Google Docs.

“We launched Voice typing in Docs to help you capture ideas, compose a letter, or even write the next great novel—all without touching your keyboard,” said Google in a blog post.

Besides typing, you can also format and edit your documents with voice on Google Docs now.

It is also very easy to get started with this new ‘Voice’ functionality in Google Docs. When you are using Google Docs using Chrome web browser, just go to ‘Tools’ and select ‘Voice typing’. Now, click on the ‘microphone icon’ that appears on the left side and you’re all set.

You can use various voice commands related to text selection, editing and formatting, insert and edit tables, navigate, and resume voice typing from a particular position.

To check the full list of commands just say ‘Voice commands help’ and you’ll see all the supported voice commands.

“Say what comes to mind—then start editing and formatting with commands like ‘copy’, ‘insert table’, and ‘highlight’,” the blog post mentioned. Google Docs only support a limited number of commands at the moment.

Ajax Mega Drop Down Menu For Blogger

Leave a Comment

How to add a dynamic drop down mega menu navigation bar into your blogger blog - As you already know that, the navigation menu (Drop down menu) is coming with every blogger templates. However, some premium templates are coming with a dynamic mega menu navigation bar. And the best part of this navigation bar is that it's looking more attractive, comparing to the other menu bar. So don't worry friend, I'm here with a new ajax mega menu bar and today I'm going to show you how you can easily set up this mega navigation menu bar into your blogger blog without any problems.(First, take a look at the navigation bar (mega menu) by clicking on the below demo links.)
Now if you like this navigation bar and want to setup into your own blog then follow the below instruction.

First go to your blogger dashboard, Now go to the "Template" section and then click on the"Edit HTML" button.

In the template, the editor finds the below code by pressing "Ctrl + F" key together from your keyboard.
<head>
After that, copy the below code and paste it just after <head>
<link href='https://maxcdn.bootstrapcdn.com/font-awesome/4.4.0/css/font-awesome.min.css' rel='stylesheet' type='text/css'/><link rel="stylesheet" type="text/css" href="https://googledrive.com/host/0B-AYvC9Y1riaOEdZNHloT3k2ZUE" />
Now, once again find the below code with the help of the search box.
</body>
After that, copy the below JavaScript code and paste it just before </body>
<script src='https://googledrive.com/host/0B-AYvC9Y1riaMm5kMkxNS1ByR0k' type='text/javascript'/>
<script type='text/javascript'>
jQuery(document).ready(function($){$('#adajaxmenu').ajaxBloggerMenu({numPosts:4,defaultImg:'https://blogger.googleusercontent.com/img/b/R29vZ2xl/AVvXsEjaf8fntLwAlqe78-5GwiFvIPKb4gg7JzbzywvQ5h8o1HJcfuGmHpjo-YyKyep3J7Etabq3d9SWyBxt0kiMyUhaRmCP4RQkL97JgEOq7uvOQNNOpjIsMtyN17wj6YJAZd_v-pDt0qKwkpg/s1600/no_image_available.png'})});$(function(){$('.searchblog').submit(function(e){if($('.search-form .searchbar').val().length==0){$('.search-form .search-alert').fadeIn().css('display','inline-block');e.preventDefault()}})});
</script>
Now copy the HTML code from below and paste it into your header section of blog.
<ul id="adajaxmenu" class="admenus">
 <li><a href='/'><i class='fa fa-home fa-lg'></i></a></li>
<li>
<a href="#">Webtools</a>
<ul>
<li><a href="Label Link Here">Tricks</a></li>
<li><a href="Label Link Here">AD Convertor</a></li>
<li><a href="Label Link Here">HTML Editor</a></li>
<li><a href="Label Link Here">Code Encode</a></li>
</ul>
</li>
<li>
<a href="#">Widgets</a>
<ul>
<li><a href="Label Link Here">Widgets</a></li>
<li><a href="Label Link Here">SEO</a></li>
<li><a href="Label Link Here">CSS</a></li>
</ul>
</li>
<li>
<a href="#">Tutorials</a>
<ul>
<li><a href="Label Link Here">Tutorials</a></li>
<li><a href="Label Link Here">Blogger</a></li>
<li><a href="Label Link Here">WordPress</a></li>
<li><a href="Label Link Here">Earning</a></li>
<li><a href="Label Link Here">Domain Finder</a></li>
</ul>
</li>
<li><a href="Label Link Here">Password Maker</a></li>
<li><a href="Label Link Here">Contact</a></li>
<li class='search-form'>
<form action='/search' class='searchblog' method='get'>
<input class='searchbar' name='q' placeholder='Search Here' size='30' type='text'/>
<input class='searchsubmit' type='submit' value='Search'/>
</form>
  <p class='search-alert'>Search form is empty!</p>
</li>  
</ul>
Replace the highlighted text with your own URL and Title. After that, click on the orange save template button to apply the changes.

If you are facing any kind of problem, then feel free to ask me via the comment section.

That's it! I hope you like this navigation menu! Stay tuned for more blogger widgets!

How To Make Your Grammar Perfect

Leave a Comment

Today, while surfing on the web I found an Interesting tool. You know friends the actual advantage of this tool is very good. The reason I'm telling you because it helps you to make your grammar perfect. So now I'm going to talk about this tool and the name of this tool is Grammarly. Yes, Grammarly is a best online tool to make your English perfect.

A Brief Description Of Grammarly: The Grammarly helps you write better English and efficiently corrects texts. Based on the context of complete sentences, Grammarly uses patent-pending technology to correct grammar mistakes, spelling mistakes, and misused words, with unmatched accuracy. Grammarly improves your text just like a human reviewer would.

Grammarly is the world's leading software suite for perfecting written English. It checks for more than 250 types of spelling, grammar, and punctuation errors enhance vocabulary usage and suggests citations. So now I'm going to show you how you can get this tool absolutely free*.

How to get registered on Grammarly?

First, you just need to visit on the official website of GrammarlyNow click on the red Get Grammarly/Sign up button. After that, It will ask you to "add a Grammarly extension on your blog" then, Click on Add.(See the below image)


Now on the next screen, you will see a Signup form like the below image. Fill this form and then click on the Sign Up button to continue.


Now on the next screen, you will need to select a plan (e.g Free/Paid) (See the below image)


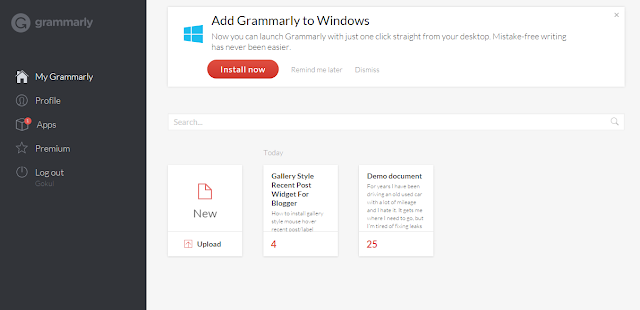
Now choose the best plan according to your need. After choosing the free plan the sites redirect you to the dashboard. There are some options to create and upload documents.


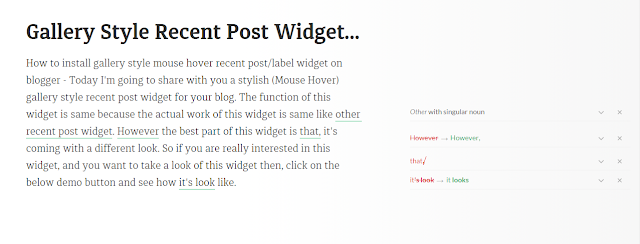
After clicking the new button, You get an online editor, simply type your content or copy and paste your content. The site checks your all grammar - spelling mistakes within seconds.


Awesome Advantages Of Grammarly
  • Correctly spelled words used in the wrong context mean embarrassing mistakes for you.
  • Enhance your sentences with Grammarly’s word choice suggestions that optimize for the context of your document. Readability and meaning are improved instantly.
  • Grammarly scans your text for proper use of more than 250 advanced grammar rules, spanning everything from subject-verb agreement to article use to modifier placement.
That's it! I hope you like this tool! Stay tuned for more tips and trick!

Gallery Style Recent Post Widget For Blogger

Leave a Comment

How to install gallery style mouse hover recent post/label widget on blogger - Today I'm going to share with you a stylish (Mouse Hover) gallery style recent post widget for your blog. The function of this widget is same because the actual work of this widget is same like other recent post widget. However the best part of this widget is that, it's coming with a different look. So if you are really interested in this widget, and you want to take a look of this widget then, click on the below demo button and see how it's look like.
Now if you like this recent post widget, and you want to add this widget into your blog then follow the below simple steps.

Go to your blogger dashboard, Now go to the "Template" section and then click on the "EDIT HTML" button.

Now find the below code by pressing "Ctrl + F" key together from your keyboard.
</head>
After that, copy the below JavaScript code and paste it just before </head>
<script type='text/javascript'>
//<![CDATA[
// Recent Post Gallery
function smartpikgrid(a){for(var t=a.feed.entry||[],e=['<div class="recent-gallery">'],i=0;i<t.length;++i){for(var l=t[i],r=l.title.$t,n=l.media$thumbnail?l.media$thumbnail.url:"http://2.bp.blogspot.com/-4fCf53FqYKM/Vccsy7apoZI/AAAAAAAAK4o/XJkv3RkC0pw/s1600/default%2Bimage.png",s=n.replace("s72-c","s"+smartpik_thumbs+"-c"),h=l.link||[],c=0;c<h.length&&"alternate"!=h[c].rel;++c);var d=h[c].href,m='<img src="'+s+'" width="'+smartpik_thumbs+'" height="'+smartpik_thumbs+'"/>',p=smartpik_title?'<span class="ptitle">'+r+"</span>":"",g='<a href="'+d+'" target="_blank" title="'+r+'">'+m+p+"</a>";e.push('<div class="ad-item">',g,"</div>")}e.push("</div>"),document.write(e.join(""))}
//]]>
</script>

Now again find the below code.
]]></b:skin>
After that, copy the below CSS code and paste it just before ]]></b:skin>
/* CSS Recent Post Gallery */
.recent-gallery {padding:0;clear:both;}
.recent-gallery:after {content:"";display:table;clear:both;}
.recent-gallery .ad-item{display:inline-block;position:relative;margin:6px 0;overflow:hidden;}
.recent-gallery .ad-item a{position:relative;float:left;margin:0 6px;text-decoration:none}
.recent-gallery .ad-item .ptitle{background:rgba(0,0,0,.7);display:block;clear:left;font-size:18px;line-height:1.3em;position:absolute;text-align:left;bottom:3px;left:3px;right:3px;top:3px;color:#fff;padding:5px;word-wrap:break-word;overflow:hidden;visibility:hidden;opacity:0;backface-visibility:hidden;transition:all .2s}
.recent-gallery .ad-item:hover .ptitle{visibility:visible;opacity:1}
.recent-gallery a img{background:#fdfdfd;float:left;padding:2px;border:1px solid #e3e3e3;transition:all .3s}
.recent-gallery a:hover img {border-color:#bbb;}
Now click on the orange save template button to make changes.

Now go to the "layout" section and then select " Add a widget ". After that, select " Html/JavaScript ". Now copy the below code and paste it in Html box.
<script>
var smartpik_thumbs = 150;
var smartpik_title = true;
</script>
<script src="/feeds/posts/summary?max-results=4&alt=json-in-script&callback=smartpikgrid"></script>
If you want to change the thumbnail size, then replace the highlighted 150.

If you want to show/hide title, then edit highlighted true.

If you want to change the number of the posts, then change the highlighted 4.

That's it! I hope you like this widget! Stay tuned for more blogger tips and tricks!

Add Responsive Recent Post Slider Widget in Blogger

3 comments

How to Install Responsive Recent Post Slider Widget on Blogger - Today I am going to show you how you can easily Install a responsive recent post slider widget in blogger. This widget is very responsive and it's comes with hover effect. Okay without any delay I'm going to tell you how you can add this responsive widget on your blog. Follow the below instructions.

Before you add this widget in your blog, make sure to take a look of this widget by clicking on the below demo button.
Okay, if you like this widget and want to install it on your own blog, then follow the below simple steps and add this dynamic widget in your blog without having any problem.

First go to your blogger dashboard, Now go to the"Template" section and then click on the "Edit html" button.

Find the below code by pressing "Ctrl + F" key together from your keyboard.
]]></b:skin>
After that, copy the below CSS code and paste it just before ]]></b:skin>:
/* CSS Responsive Slider Recent Post */#featuredpost {margin:15px auto;}#slides *{-moz-box-sizing:border-box;-webkit-box-sizing:border-box;box-sizing:border-box}#slides ul,#slides li{padding:0;margin:0;list-style:none;position:relative}#slides ul{height:320px}#slides li{width:50%;height:100%;position:absolute;display:none}#slides li:nth-child(1), #slides li:nth-child(2), #slides li:nth-child(3), #slides li:nth-child(4), #slides li:nth-child(5){display:block}#slides li:nth-child(1){left:0;top:0}#slides li:nth-child(2){left:50%;width:25%;height:50%}#slides li:nth-child(3){left:75%;width:25%;height:50%}#slides li:nth-child(4){left:50%;top:50%;width:25%;height:50%}#slides li:nth-child(5){left:75%;top:50%;width:25%;height:50%}#slides li:nth-child(1) h4 {overflow:hidden;font-size:25px;bottom:0;color:#fafafa;width:100%;padding:10px 10px 10px 90px;text-align:left;text-transform:uppercase;background:rgba(0,0,0,0.3);height:90px;font-family:'Oswald';text-shadow:2px 2px 0 rgba(0,0,0,0.2);line-height:32px;left:0;}#slides li:nth-child(1) .label_text {font-size:30px;display:block;bottom:10px;left:10px;padding:0;font-family:'Oswald';box-shadow:5px 3px 0 rgba(0,0,0,0.2);}#slides li:nth-child(1) span.dd {display:block;font-size:30px;padding:12px 15px;background:#ff6553;margin:0;}#slides li:nth-child(1) span.dm {display:block;font-size:14px;background:#333;color:#fff;padding:5px 21px;text-transform:uppercase;margin:0;}#slides li:nth-child(1) span.dy, #slides li:nth-child(1) span.autname{display:none;}#slides a{display:block;width:100%;height:100%;overflow:hidden}#slides img{display:block;width:100%;height:auto;border:0;padding:0;background-color:#333;-moz-transform:scale(1.0) rotate(0);-webkit-transform:scale(1.0) rotate(0);-ms-transform:scale(1.0) rotate(0);transform:scale(1.0) rotate(0);transition:all 0.6s linear;}#slides li a:hover img {-moz-transform:scale(1.1) rotate(1deg);-webkit-transform:scale(1.1) rotate(1deg);-ms-transform:scale(1.1) rotate(1deg);transform:scale(1.1) rotate(1deg);transition:all 0.3s linear;}#slides .overlayx{width:100%;height:100%;position:absolute;z-index:2;background-image:url(http://2.bp.blogspot.com/-0haO2Mfkjjk/VDgZww2tfEI/AAAAAAAAHAk/zhu3INYSkHA/s1600/fade.png);background-position:50% 40%;background-repeat:repeat-x;}#slides h4{position:absolute;bottom:40px;margin:0;font-size:13px;font-family:'Oswald';left:10px;padding:5px 10px;color:#f9f9f9;z-index:3;line-height:20px;font-weight:normal;background:rgba(41,41,41,0.7);text-align:left;text-transform:uppercase;margin-right:10px;}#slides .label_text{font-size:12px;color:#fff;bottom:10px;z-index:3;left:10px;position:absolute;background:rgba(255,101,83,0.8);padding:3px 6px;font-family:'Oswald';text-transform:uppercase;}#slides li:nth-child(2) .autname,#slides li:nth-child(3) .autname,#slides li:nth-child(4) .autname,#slides li:nth-child(5) .autname{display:none;}#slides .overlayx,#slides li{transition:all .4s ease-in-out}#slides li:nth-child(1) .overlayx{display:none;}#slides li:hover .overlayx{opacity:0.1}
@media only screen and (max-width:800px){#slides li:nth-child(1) h4 {font-size:18px;line-height:24px;}}
@media only screen and (max-width:600px){  #slides ul{height:600px}  #slides li:nth-child(1){width:100%;height:50%}  #slides li:nth-child(2){top:50%;height:25%;left:0;width:50%}  #slides li:nth-child(3){left:50%;top:50%;width:50%;height:25%}  #slides li:nth-child(4){left:0;top:75%;height:25%;width:100%}  #slides li:nth-child(5){display:none;}}
@media only screen and (max-width:480px){#slides li:nth-child(1) h4 {font-size:13px;line-height:16px;}}
Now copy and paste the below JavaScript just above the </body>
<script src='https://googledrive.com/host/0B-AYvC9Y1riaYkZwVUtyOFBqY0U' type='text/javascript'/>
<script type='text/javascript'>
//<![CDATA[
$(document).ready(function () {
FeaturedPost({
blogURL:"http://www.smartpik.in",
MaxPost:8,
idcontaint:"#featuredpost",
ImageSize:500,
interval:10000,
autoplay:true,
tagName:false
});
});
//]]>
</script>
Do not forget to replace the highlighted "http://www.smartpik.in" with your own blog URL.

Now copy and paste the below "HTML" code anywhere. Just after/before "content-wrapper" or under "menu-wrapper".
<b:if cond='data:blog.url == data:blog.homepageUrl'><div id="featuredpost"></div></b:if>
That's it, click on the orange save template button to make changes.

Note- If you want to bring up this slider on every page, then replace below "HTML code" with above "HTML code".
<div id="featuredpost"></div>
That's it! I hope you like this widget! Stay tuned for more cool widgets, Tips and Tricks!

How To Setup Custom Robots Header Tags in Blogger

Leave a Comment

Custom Robots Header Tags is a best SEO optimization tool available on the web. Custom Robots Header Tags are playing best roll to improve the search result and gain some extra traffic from search engine. In this time every bloggers are doing lots of hard work to improve his blog traffic. But the work, does not end here. Both of us are working on it. The blogger’s developer’s team is also working hard to improve its features and usability. If you are a new blogger and you don't know anything about this tool. So don't worry, today I'm going to tell you everything about this tool. Custom robots header tags is a handy tool which helps us to select which portion of our blog should be indexed and which should be protected from indexing in search results. Now If you want to setup this tool on your blog, then follow the below instructions.

First go to your blogger dashboard, Now go to the "Setting" and then select "Search preferences".

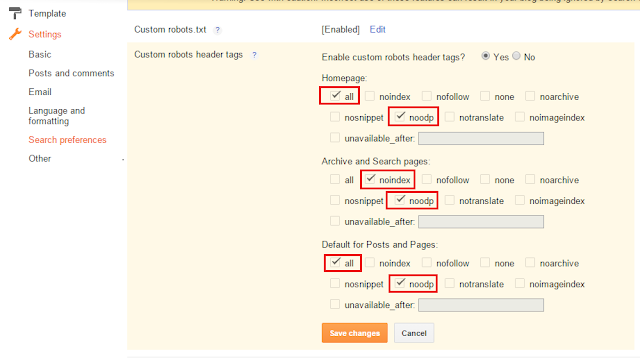
Click on edit link under the Custom Robots Header Tags section as shown in below screenshot.


Now click on "Yes".

Once you click on the "Yes" then you will see many options. Simply tick on the options as shown in the below image.


When you are finished simply click on orange "Save changes" button to make changes.
 Value
Description
 All
Allow search engines to index the entire contents of the page and blog.
 Noindex
Do not allow search engines to display the page in search results and do not show the "Cached" link in search results.
 Nofollow
This tag does not allow the search engines to follow the links on this page.
 None
This tag has a value equivalent to tag noindex, nofollow.
 Noarchive
Do not allow search engines to show a "Cached" link in search results.
 Nosnippet
Search engines are not allowed to show the snippet description in search results for this page.
 Noodp
This tag does not allow search engines to use metadata from the Open Directory Project for the title or snippet shown for this page.
 Notranslate
Search engines are not allowed to offer a translation of this page in search results.
 Noimageindex
Images contained on this page, are not allowed to index by search engines
 Unavailable  after
The page will not appear in search results after the date / time specified. The date / time must be specified in RFC 850 format.
That's it! I hope you like this Trick! Stay tuned for more blogger widgets, tips and trick!

Dynamic Random Post Widget With Hover Effect For Blogger

Leave a Comment

How to add a dynamic random post widget (Images Only) with hovering effect in blogger - If you have a dashing blog with lots of content, then a random post widget is a very unique way to display your blog article randomly. The best part of this widget is that, with a little touch of CSS this widget will look more elegant when you touch or expose the cursor on it. So without wasting your time, I'm moving on the main topic and the topic is that, today with the help of this article we are going to learn how we can easily add this dynamic random post widget in our blog with the help of some CSS code.

Before you add this widget in your blog, make sure to take a look of this widget by clicking on the below demo button.
Okay, if you like this widget and want to install it on your own blog, then follow the below simple steps and add this dynamic widget in your blog without having any problem.

Login to your blogger account – Login, Select your blog and then go to the "layout" section.

Now add a new widget by clicking on the "Add a gadget" link and then select the "Html/JavaScript" from the popup box.

After that copy the following Html Code and paste it in the html/JavaScript box.
<style type='text/css'>
#random-posts{width:100%;background:none;}
#random-posts ul {margin: 0 auto!important; padding: 0 !important;text-align:center }
#random-posts ul li {background:none ;list-style-type: none;margin:0;padding:0 !important}
#random-posts li{float:left;list-style:none;border:none;width:90px;height:90px;overflow:hidden;margin-right:5px !important;margin-top:5px !important}
#random-posts img{float:left;width:100%;height:100%;max-width:none;max-height:none;min-width:0;min-height:0;;border:none;outline:0;position:static;transition:all .8s ease-out;}
#random-posts img:hover {-webkit-transform:scale(1.3);-ms-transform:scale(1.3);-o-transform:scale(1.3);transform:scale(1.3);}
</style>
<div id="random-posts">
<ul>
<script type='text/javaScript'>
var rdp_numposts=9;
var rdp_snippet_length=0;
var rdp_info='no';
var rdp_comment='Comment';
var rdp_disable='';
var rdp_current=[];var rdp_total_posts=0;var rdp_current=new Array(rdp_numposts);function totalposts(json){rdp_total_posts=json.feed.openSearch$totalResults.$t}document.write('<script type=\"text/javascript\" src=\"/feeds/posts/default?alt=json-in-script&max-results=0&callback=totalposts\"><\/script>');function getvalue(){for(var i=0;i<rdp_numposts;i++){var found=false;var rndValue=get_random();for(var j=0;j<rdp_current.length;j++){if(rdp_current[j]==rndValue){found=true;break}};if(found){i--}else{rdp_current[i]=rndValue}}};function get_random(){var ranNum=1+Math.round(Math.random()*(rdp_total_posts-1));return ranNum};
</script>
<script type='text/javaScript'>
function random_posts(json){a=location.href;y=a.indexOf('?m=0');for(var i=0;i<rdp_numposts;i++){var entry=json.feed.entry[i];var rdp_posttitle=entry.title.$t;if('content'in entry){var rdp_get_snippet=entry.content.$t}else{if('summary'in entry){var rdp_get_snippet=entry.summary.$t}else{var rdp_get_snippet="";}};rdp_get_snippet=rdp_get_snippet.replace(/<[^>]*>/g,"");if(rdp_get_snippet.length<rdp_snippet_length){var rdp_snippet=rdp_get_snippet}else{rdp_get_snippet=rdp_get_snippet.substring(0,rdp_snippet_length);var space=rdp_get_snippet.lastIndexOf(" ");rdp_snippet=rdp_get_snippet.substring(0,space)+"&#133;";};for(var j=0;j<entry.link.length;j++){if('thr$total'in entry){var rdp_commentsNum=entry.thr$total.$t+' '+rdp_comment}else{rdp_commentsNum=rdp_disable};if(entry.link[j].rel=='alternate'){var rdp_posturl=entry.link[j].href;if(y!=-1){rdp_posturl=rdp_posturl+'?m=0'}var rdp_postdate=entry.published.$t;if('media$thumbnail'in entry){var rdp_thumb=entry.media$thumbnail.url}else{rdp_thumb="https://blogger.googleusercontent.com/img/b/R29vZ2xl/AVvXsEisd-2XgiJDwTfdWGr7DWrziaEhHlQM9aV4Er9Ya0IBLtAnCVyqBWskrtYkof44HGwMfS69_GiFg90DhCl3zofQQWZCLqd3FJDRmKRrYKZfbzbiZWcwYWoduo2SDdse9YbiirSGlh3sAZ8i/"}}};document.write('<li>');document.write('<a href="'+rdp_posturl+'" rel="nofollow" title="'+rdp_posttitle+'"><img alt="'+rdp_posttitle+'" src="'+rdp_thumb+'" title="'+rdp_posttitle+'" height="90" width="90"/></a>');if(rdp_info=='yes'){document.write('<span>'+rdp_postdate.substring(8,10)+'/'+rdp_postdate.substring(5,7)+'/'+rdp_postdate.substring(0,4)+' - '+rdp_commentsNum)+'</span>'}document.write('<div style="clear:both"></div></li>')}};getvalue();for(var i=0;i<rdp_numposts;i++){document.write('<script type=\"text/javascript\" src=\"/feeds/posts/default?alt=json-in-script&start-index='+rdp_current[i]+'&max-results=1&callback=random_posts\"><\/script>')};
</script>
</ul>
</div>
The JavaScript code above, var rdp_numposts= 9; is to show how many posts you want to display in the widget. Change the number 9 and adjust it according to your need.

After that, click on the orange save button and then refresh your blog. The sidebar will display a random post widget on each of your blog pages.

That's it! I hope you like this random post widget! Stay tuned for more blogger widgets!

Auto Scrolling Recent Posts Bar widget For Blogger

Leave a Comment

How to add a simple and stylish Auto Scrolling Recent Posts bar/ticker in blogger blog - Breaking news bar is also one of the most important widget for every blogger blog. With the help of this news ticker you can easily display your recent posts in one single bar. And I think it's a very good way to attract your visitors because if you set up this widget on your blog, then the visitors will be able to see your all recent post without leaving the pages. So today with the help of this post I'm going to show you how you can easily setup a breaking news bar into your blogger blog. First take a look of this Auto Scrolling Recent Posts bar by clicking on the below demo button:
If you like this Auto Scrolling Recent Posts bar/ticker and want to add it on your own blog then follow the below steps.

First go to your blogger dashboard, And then go to "Template" section and then click on "Edit html" button.

Now in template editor find the below code by pressing "Ctrl + F" key together from your keyboard.
]]></b:skin>
After that copy the below CSS code and paste it just before ]]></b:skin>:
#breakingnews {margin:15px 0 0 100px;margin-right:100px;height:40px;line-height:27px;overflow:hidden;background:#fff;border:1px solid #e6e6e6;}#breakingnews .breakhead {position:absolute;background:none repeat scroll 0 0 #363b40;color:#fff;display:block;float:left;font-family:inherit;font-size:16px;font-weight:400;text-transform:uppercase;padding:6.5px 22px;}#adbreakingnews li a {font-weight: bold;font-family: "Avant Garde",Avantgarde,"Century Gothic",CenturyGothic,AppleGothic,sans-serif;font-weight:700;color:#666;margin-top:10px;transition:all 0.5s ease-in-out;}#adbreakingnews li a:hover {color:#359bed;}#adbreakingnews {float:left;margin-left:75px;margin-top:6px;}#adbreakingnews ul,#adbreakingnews li{list-style:none;margin:0;padding:0}
@media only screen and (max-width:640px){#breakingnews {margin:20px 0 0 15px;margin-right:15px;}#breakingnews .breakhead {padding:6.5px 14px;}#adbreakingnews {margin-left:50px;}}
Now once again find the below code.
</body>
After that, copy the below code and paste it just before </body>
<script type='text/javascript'>
//<![CDATA[
// Breaking News
$(document).ready(function(){var e="http://www.smartpik.in",t=20;$.ajax({url:""+e+"/feeds/posts/default?alt=json-in-script&max-results="+t,type:"get",dataType:"jsonp",success:function(e){function t(){$("#adbreakingnews li:first").slideUp(function(){$(this).appendTo($("#adbreakingnews ul")).slideDown()})}var n,r,s="",a=e.feed.entry;if(void 0!==a){s="<ul>";for(var l=0;l<a.length;l++){for(var o=0;o<a[l].link.length;o++)if("alternate"==a[l].link[o].rel){n=a[l].link[o].href;break}r=a[l].title.$t,s+='<li><a href="'+n+'" target="_blank">'+r+"</a></li>"}s+="</ul>",$("#adbreakingnews").html(s),setInterval(function(){t()},5e3)}else $("#adbreakingnews").html("<span>No result!</span>")},error:function(){$("#adbreakingnews").html("<strong>Error Loading Feed!</strong>")}})});
//]]>
</script>
Replace the highlighted http://www.smartpik.in link with your own blog link.

Now run your mind and add the below Html code where you want to show this scrolling recent post bar. (Add any one html)
<b:if cond='data:blog.pageType == "index"'>
<div id='breakingnews'><span class='breakhead'><i class='fa fa-cog fa-spin'/></span>
<div id='adbreakingnews'>Loading...</div></div>
</b:if>
It will appear on home page only
<div id='breakingnews'><span class='breakhead'><i class='fa fa-cog fa-spin'/></span>
<div id='adbreakingnews'>Loading...</div></div>
It will appear on every page (e.g Home page, static pages and posts).

Now copy the below "Font-awesome" CSS code and paste it just after <head>
<link href="https://maxcdn.bootstrapcdn.com/font-awesome/4.4.0/css/font-awesome.min.css" rel="stylesheet"/>
After that, click on the orange save template button to apply the changes.

That's it! I hope you like this Auto Scrolling Bar! Stay tuned for more blogger widgets!

Dynamic Ways To Increase Blog Traffic

Leave a Comment


How to drive more traffic to your newly created blog within a few days - At the present time every blogger wants to drive more traffic to their blog. Because if you have a good traffic to their blog then you can earn a good income from your blog. So if you are a new blogger and want to learn how to get genuine traffic, then you are at right place because today with the help of this article we are going to how we can drive more traffic to their blog within a few days. Today I'm going to share with you 11 dynamic ways to increase your blog traffic. If you ready, then read the below points.

Don't Copy/Paste, Always Write Quality Content.

At this time, so many bloggers are doing this major mistake. A quality content is more attractive comparing to copy/paste. So friends, keep in mind and never do this kind of work. As for as possible, always think about to write a quality content. Always publish a quality content to your readers. (While writing an article should not think like an admin always think like a visitor).

Post Comments On Other Blogs.

Doing Comments on any other blog is also good for making some extra free backlinks. But keep in mind always make comments on that blog which is related to your own blog niche. (e.g. If you have a discount/coupon related blog, then only comment on promo/coupons related blog.)

Use Social Media Plugins

It's my suggestion to you guys if you are a new blogger, then always use social media plugins/buttons on your blog. Because at this time it's helping everyone to drive more traffic to your blog. (You can get some cool social media widgets from below links.)

Do Guest Posting

Guest posting is also good for every new blogger. The reason I'm saying to you because if you are writing a quality content on some other blog, then it will help to drive more traffic to your blog. Simply add your own blog URL on that article and let them know about your blog.

Image Optimization

Before publishing your article keep in mind. "don't forget to optimize all your images".

Use Responsive Templates

As far as possible make your blog template responsive. A responsive and mobile friendly template is good for grow up your audience. You can get some responsive, seo ready and mobile friendly templates by clicking on the below link.

Advertising

If you have some extra cash, then advertising on Google Adwords or Facebook is also good to drive more traffic to your blog. You can also advertise your website using the Stumbleupon ads – If anyone like your ad, then you can get more free traffic.

Finding Keywords

Find a high CPC keyword for your blog by using this keyword research tool. It's a free one provided by Google.

Make Some Video Post

Create a YouTube channel and make some video posts because video Blogging is a great way to go viral.

Always Be Inspiring

The best one is, tell your audience about overcoming adversity, or the mindset necessary to do so. Encourage them to keep trying, or set up a challenge that they can use as motivation to complete something important. (At the last I want to say "blogging is incredible".)

That's it! I hope you like this tips! Stay tuned for more blogging tips and tutorials! Thanks You!
Powered by Blogger.

Business

[Blog][feat-sec1]

Flickr Widget

Recent

Comments

Most Recent

Random Posts

Facebook

Advertising

Popular Posts